Why Arduino?

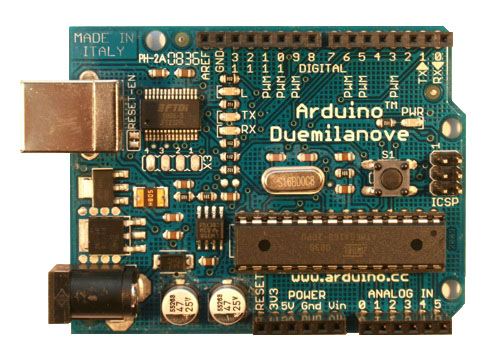
In 2007, I was looking for a fun way to get into the lower level of programming to get into the physical computing realm. My brother had been playing with the Arduino, so I ordered a Diecimila from Adafruit Industries. Arduino development is typically done in the eponymous IDE based on Wiring and Processing. That was more than sufficient for most of my early explorations – I’m by no means an electrical engineer, so making a few LEDs light up based on a potentiometer’s input was plenty of fun.
A new project
Now that I’ve had some time to experiment, the usual happened: I’ve started to see interesting possibilities all over the place. I’ll be following my development of a TED-style countdown timer and in the process, I’ll release source for a digit display library that uses the TI CD4067BE multiplexer to save some of the Arduino’s precious output pins.
I’ve gone through the motions of setting up avr-gcc on Mac OS X and on Linux, so I’ll be covering both of those paths in the next post. For now: A bit of background.
Background: Arduino and AVR
The Arduino hardware platform supports one key piece of silicon that is the object of interest for lower-level programming: an Atmel AVR microcontroller.
AVR

Each microcontroller in Atmel’s AVR family is an 8-bit RISC processor with embedded non-volatile flash memory. They are available with a variety of form factors and flash capacities, as well as some other specialized features.

Like many other RISC architectures, AVRs have 32 processor registers. Here, they are 8-bit wide.
The particular model used in the Arduino Diecimila is the ATMEGA168-20PU running at 16MHz. It contains 16KB of flash, 1KB of SRAM, and most instructions in the set are single-clock execution.

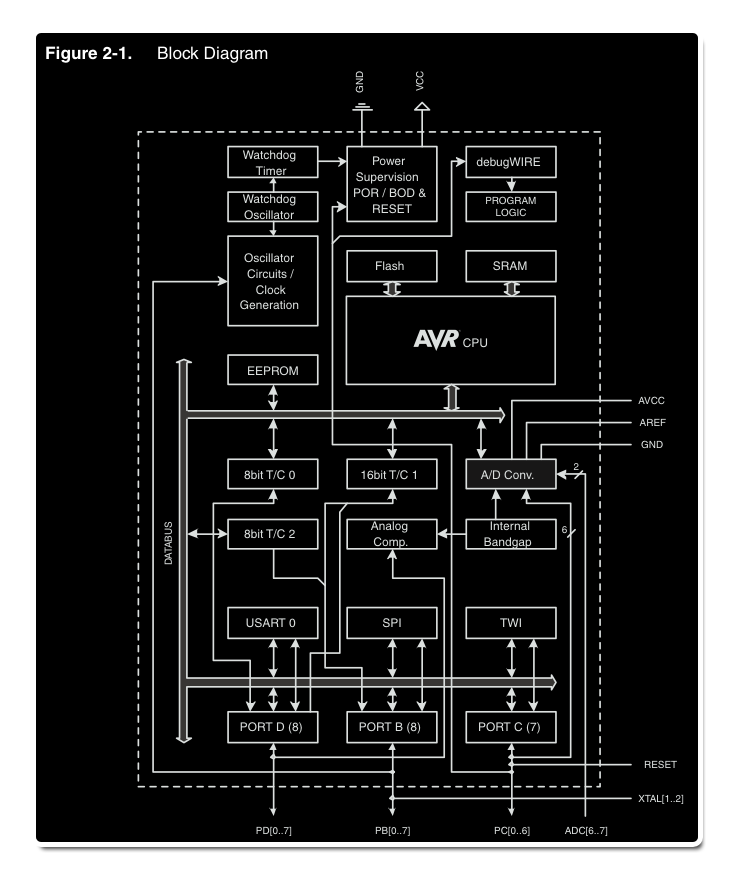
Here, the key aspects of the diagram to notice are the CPU connected to Flash and SRAM and the ports D, B, and C at the bottom. Obviously enough, we’ll be storing our programs in that Flash. The Ports B, C, and D map to the digital and analog inputs and outputs of our Arduino – for instance, Port B.6 maps to the digital pin 9 of the Arduino board. That will be examined in more detail once we get to coding.
Arduino
Arduino’s hardware provides a lot of tools that make working with the AVR simpler. Almost all Arduino boards come equipped with an FTDI FT232RL USB-to-serial adapter on-board to provide serial communications for debugging and programming. USB also usually can provide 5V power to the board, including the AVR chip. Finally, as mentioned above, the Arduino mainline boards provide breakout headers for many of the pins on the DIP, such as Ports B-D.

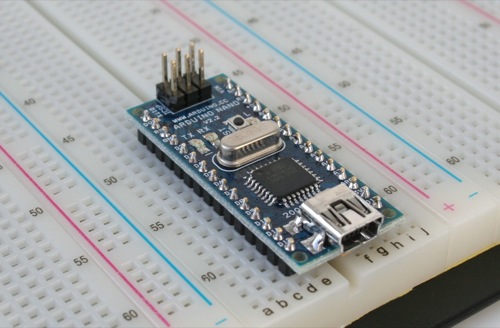
Some specialized Arduino form factors, such as the Nano, opt instead to make the Arduino board itself breadboardable, providing pin-outs to plug it directly into a breadboard.
The Arduino board also provides the 16.0MHz clock and some LEDs to inform us when flash memory is being read and written over serial. A reset button is present on most Arduinos.
Returning to the serial adapter: we use serial to write our programs to the AVR’s Flash memory when using the Arduino toolchain. Internally, the Arduino IDE uses a tool called avrdude (AVR Downloader/UploaDEr) to open the appropriate channels and write to the flash. Using this serial link rather than a dedicated programmer is called ICSP – in-circuit serial programming. When you buy an Arduino, the AVR chip itself has been pre-flashed with an Arduino “bootloader” that facilitates this programming via serial rather than requiring an external programmer. If you wish to build a new home for your Arduino-based designs and use a fresh AVR, you may need to flash in the bootloader using an actual programmer like the AVRISP or USBtinyISP.
Conclusion, Part 1
When you use the word “Arduino”, there is a lot of ambiguity as to what you refer to. It could mean:
- The platform and initiative as a whole
- The physical hardware board
- Old serial-based boards
- Diecimila
- Duemilanove
- Nano
- … and several others.
- The Arduino IDE
- the Wiring language
- the Processing-like front-end
- The Arduino bootloader
Hopefully those distinctions are now clear and we have a basic understanding of what the AVR’s role is in that picture. Next time, we’ll look at installation of our toolchain – avr-gcc, avr-libc, and avrdude – on Mac OS X and Ubuntu Linux.